The compute behind Azure DevOps pipelines comes in the form of build agents. By default pipelines will run on a Microsoft Hosted agent (typically an Azure Virtual Machine running in the same geography as your Azure DevOps Organisation). The problems with Hosted agents come when you need more control over the machines that run them, broadly these issues fall into the following categories..
- Agents need access to private resources (e.g. endpoints on a network)
- Agents have specific hardware requirements (e.g. GPU)
- Agents have specific software requirements (e.g. per-seat licences)
To solve these requirements you can provision your own agents, these can be physical machines, cloud based virtual machines or, most recently, containers. Once provisioned the agent is associated with an agent pool and will periodically check the queue for new work. Full details on provisioning all types of “Self-host” agents can be found here.
The most recent addition is the ability to run agents as container images. It is possible to run agents on something like Azure Container Instances but the real power comes from using an Orchestrator like Kubernetes. A typical build agent needs to meet the following criteria
- A new “clean” agent per job/request. You don’t want side-effects leaking to subsequent jobs.
- Agents start up fast. The fast agents can be provisioned the fewer items in the queue.
- The number of agents scales according to the number of messages in the queue.
Points 1 and 2 are where Kubernetes shines, additional pods or jobs can be added in seconds. The scaling requirement (Point 3) is slightly more challenging however. Kubernetes has the Horizontal Pod Autoscaler will vary the number of pods in a replicaset based on resource metrics (like cpu or memory) but can’t easily be connected to external event sources (like our Azure DevOps pending jobs Queue) without tinkering at the API level.
Enter Kubernetes Event-driven Autoscaling (KEDA), and more specifically, the KEDA scaler for Azure Pipelines. The KEDA scaler acts on a new Kubernetes resource called a ScaledObject (for pods) or a ScaledJob (for jobs), we provide the agent pool id, some credentials and it figures out how many pods/jobs are needed.
QUICK NOTE: For the rest of the description I will be using ScaledJobs, rather than ScaledObjects. I ran into some side-effects with ScaledObjects where pods weren’t cleaned up correctly in Azure DevOps that needs further investigation.
A really good article on scaling Azure DevOps agents with KEDA can be found on the official KEDA blog. In it they detail one of the challenges around working with ScaledJobs specifically around the need for a placeholder agent. To summarize, Azure DevOps won’t queue new jobs if there are no agents listed (which there won’t be if you are scaling on demand). The workaround is to have a placeholder agent present in the pool but Disabled! This means our agent deployment needs to have both a ScaledJob definition (for the actual agents) and a deployment containing a single pod (our placeholder). We handle disabling this agent in our deployment script using the Azure DevOps REST APIs.
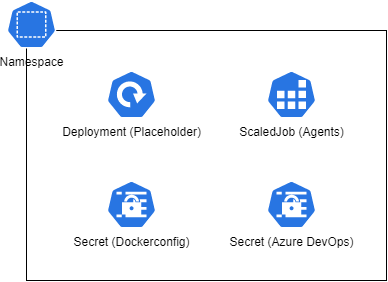
Our Helm chart will deploy the following resources.

| Resource Name | Description |
|---|---|
| Namespace | Each named instance of the helm chart will be contained within its own namespace |
| Deployment (Placeholder) | This deploys a single pod using the build agent container image |
| ScaledJob (Agents) | This is the KEDA magic! This definition points at the Azure DevOps Agent Pool and will provision new Kubernetes jobs for each waiting run |
| Secret (Dockerconfig) | Contains the authentication details for the Azure Container Registry so that the chart can pull the correct images |
| Secret (Azure DevOps) | Contains the credentials used by KEDA to monitor the pending pipeline runs, this is mounted into the Pod/Jobs as an environment variable |
So how does this work in practice…
Step 1: Deploy the infrastructure
Well first we are going to need a kubernetes cluster. I have provided some bicep files to deploy the cluster to your subscription (and also a github actions pipeline that shows the steps)
In the example below I am using github actions environment variables to provide the following details
| Name | Description |
|---|---|
${{vars.LOCATION}} |
The Azure region to deploy your resources too (I used uksouth) |
${{vars.RESOURCE_PREFIX}} |
A prefix added to all resources |
# Make sure you have the KedaPreview feature registered
az feature register --name AKS-KedaPreview --namespace Microsoft.ContainerService
az provider register -n Microsoft.ContainerService

# Deploy the bicep file
az deployment sub create -f "./main.bicep" --location "${{vars.LOCATION}}" -p resourcePrefix="${{vars.RESOURCE_PREFIX}}"
Once deployed you will have a resource group, an Azure Container Registry and an Azure Kubernetes service.
QUICK NOTE: This should be all you need to do, the bicep file contains a flag to enable KEDA on the cluster, however at the time of writing this wasn’t working so it needs to be installed manually
To Install KEDA, run the following (you will need the Azure CLI, Helm and Kubectl installed).
# Connect to the AKS cluster from the CLI
az aks get-credentials --name "${{ vars.RESOURCE_PREFIX }}-aks" --resource-group "${{ vars.RESOURCE_PREFIX }}-rg"

#Install KEDA
helm repo add kedacore https://kedacore.github.io/charts
helm repo update
kubectl create namespace keda
helm install keda kedacore/keda --namespace keda
Step 2: Build and Push the Agent Image
The Image for the build agent is based on the example given in the Microsoft Learn article. We want a fresh agent for each request so we are using the --once flag described here.
Once again a Github action has been provided to describe the build and upload to the Container Registry.
The action uses the az acr build command to do the heavy lifting. The image is tagged with latest and the Run id.
acrName="${{vars.RESOURCE_PREFIX}}acr"
az acr build -r $acrName -t "azdo-build-agent:latest" -t "azdo-build-agent:${{ github.run_id }}" "./src/azdo_build_agent"
Step 3: Build and Push the Helm Chart
The build agent resources are deployed using a helm chart, I have a separate action to build, version and publish the helm chart to the Azure Container Registry (ACR can act as an OCI repository).
The action ensures that helm is installed before doing a helm package and helm push
# Package the chart
helm package "./helm/scaled-azdo-build-agent" --app-version "${{env.HELM_APP_VERSION}}" --version "${{env.HELM_CHART_VERSION}}"

# Log into the registry
accessToken=$(az acr login --name "${{env.ACRNAME}}" --expose-token --query accessToken -o tsv)
echo $accessToken | helm registry login --username "00000000-0000-0000-0000-000000000000" --password-stdin "${{env.ACRNAME}}.azurecr.io"

# Push the versioned chart
helm push "${{env.HELM_CHART_NAME}}-${{env.HELM_CHART_VERSION}}.tgz" "oci://${{env.ACRNAME}}.azurecr.io"
Step 4: Deploy to the cluster.
In the final pipeline we do a helm upgrade to grab the versioned chart from the repository and push it to the cluster. The following parameters must be provided when running the steps (in my case I use a combination of environment variables, environment secrets and local variables)
| Name | Description |
|---|---|
${{env.AKS_NAME}} |
The AKS cluster name (e.g. $RESOURCE_PREFIX + -aks) |
${{env.RESOURCE_GROUP}} |
The resource group name (e.g. $RESOURCE_PREFIX + -rg) |
${{env.ACR_NAME}} |
The Azure Container Registry name (e.g. $RESOURCE_PREFIX+ acr) |
${{env.HELM_RELEASE_NAME}} |
The name given to this specific deployment of agents (can have multiple on a cluster |
${{env.HELM_CHART_NAME}} |
The name of the helm chart (typically scaled-azdo-build-agent) |
${{vars.DOCKER_IMAGE_TAG}} |
The version of the agent image to deploy (typically latest) |
${{secrets.AZDO_URL}} |
The url of your Azure DevOps Organisation (e.g. https://dev.azure.com/myorg) |
${{secrets.AZDO_PAT}} |
A Personal Access Token from Azure DevOps with Permissions to Manage Agent Pools |
${{vars.AZDO_AGENT_POOL}} |
The name of the agent pool to add the agents to |
# Log into the AKS cluster
az aks get-credentials --name "${{env.AKS_NAME}}" --resource-group "${{env.RESOURCE_GROUP}}"

# Get the ACR credential so that helm can grab the container image from the repository
acrCred=$(az acr credential show -n "${{env.ACR_NAME}}" --query passwords[0].value -o tsv)

# Log into the ACR Reqistry to retrieve the helm chart
accessToken=$(az acr login --name "${{env.ACR_NAME}}" --expose-token --query accessToken -o tsv)
echo $accessToken | helm registry login --username "00000000-0000-0000-0000-000000000000" --password-stdin "${{env.ACR_NAME}}.azurecr.io"

# Apply the Helm chart with some parameters.

helm upgrade ${{env.HELM_RELEASE_NAME}} \
    "oci://${{env.ACR_NAME}}.azurecr.io/${{env.HELM_CHART_NAME}}" \
    --version "${{vars.HELM_CHART_VERSION}}" \
    --install \
    --wait \
    --set image.repository="${{env.ACR_NAME}}.azurecr.io/azdo-build-agent" \
    --set image.tag="${{vars.DOCKER_IMAGE_TAG}}" \
    --set azdo.url="${{secrets.AZDO_URL}}" \
    --set azdo.agentManagementToken="${{secrets.AZDO_PAT}}" \
    --set azdo.pool.name="${{vars.AZDO_AGENT_POOL}}" \
    --set imageCredentials.registry="${{env.ACR_NAME}}.azurecr.io" \
    --set imageCredentials.username="${{env.ACR_NAME}}" \
    --set imageCredentials.password="$acrCred"
Lastly we use the Azure DevOps REST API to disable the placeholder agent in that pool to ensure that they don’t take requests.
agentPool="${{vars.AZDO_AGENT_POOL}}"
agentName="${{env.HELM_RELEASE_NAME}}-${{env.HELM_CHART_NAME}}-placeholder"
echo "$agentName"

# Get the Pool Id based on the name
poolId=$(curl -f -s -u :${{secrets.AZDO_PAT}} "${{secrets.AZDO_URL}}/_apis/distributedtask/pools?poolName=$agentPool&api-version=7.1-preview.1" | jq ".value[0].id")
echo "pool id: $poolId"

sleep 5

# Get the first agent from the pool that matches our name
agentId=$(curl -f -s -u :${{secrets.AZDO_PAT}} "${{secrets.AZDO_URL}}/_apis/distributedtask/pools/$poolId/agents?api-version=7.1-preview.1" | jq -r ".value | map(select(.name == \"$agentName\")) | .[0] | .id")
echo "agentId id: $agentId"

# Disable the agent
curl -s -f -u :${{secrets.AZDO_PAT}} -X PATCH -d "{ \"id\": \"$agentId\", \"enabled\": \"false\", \"status\": \"offline\"}" -H "Content-Type: application/json" "${{secrets.AZDO_URL}}/_apis/distributedtask/pools/$poolId/agents/$agentId?api-version=7.1-preview.1"
Step 5: Use the agents
To prove the agents were working I created the following pipeline in Azure Devops. It outputs the azure CLI version and then sleeps for 10 seconds.
trigger: none

pool:
  name: KedaPool

steps:
  - bash: az --version
    displayName: Azure CLI version check

  - bash: sleep 10
    displayName: Sleep 10
The pool name name: KedaPool is the key bit for running against the self host agents. (you may need to authorize the pipeline on first run).
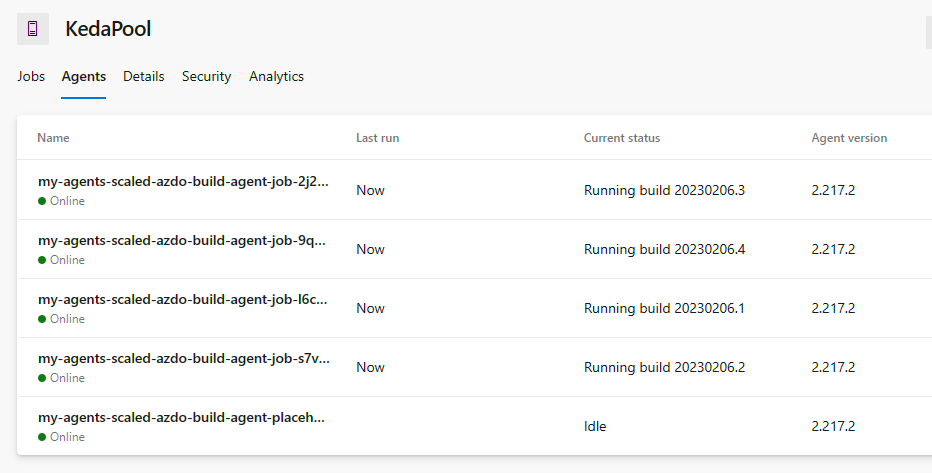
Below is the agent poll with a number of pipeline runs in progress.

QUICK NOTE: The number of parallel runs is dictated by the number of Agents available (in our case limited by the resources on the cluster) AND the number of parallel jobs available in Azure DevOps. This latter value tends to be the bigger restriction as it is a paid for resource.
